21 August 2012

Victorian Ladies DYB

Good Morning,
Just popping in to add a photo of my naked blocks for the upcoming CQI Victorian Ladies DYB (do your block) round robin that begins on September 1st.

(Image Source/Credit: Doll on the Hill Factory)

This round robin will have 6 participants, each piecing 6 blocks, 6" square. As the blocks are mailed out, each of the participants will chose a block to work on, with each person working the entire block. The remaining block will be completed by the block maker.

I will post photos as the rotation progresses.

Until Next time...Happy Needling!!!

Gerry

27 July 2012

Pets Round Robin - Updated

Well, since I've already completed 3 of the 4 4 of 4 blocks I have to work on in this round robin, I thought it might be time to post a couple of photos. I've also received my finished block back.

This is my pieced block. It is a tribute to my sweet, Bella Donna.


This is the work I did on Darlene's block


And on Alice's block


And on Linda's block


Kristie's block will be the 4th and final block in this round robin. I don't expect to receive the last block until mid August. I'll post photo's here after I work it.

And on Kristie's block


And my finished block


Everyone did such lovely work on this block. Bella would be proud of how well she was 'captured' on fabric!

Thanks Ladies!!!

Until Next time...Happy Needling!!!

Gerry

20 July 2012

CQJP 2012 - July

Here is the July (white) block. I pulled some of the colors out of the fabrics but tried to keep it as tone on tone as possible.


And here the blocks are so far...


Until Next time...Happy Needling!!!

Gerry

19 July 2012

CQJP 2012 - June

Here is my completed June block for the CQJP 2012 project. It's an orange block although it really looks more brown in the photo. This one was a little more difficult to keep tone on tone, not having a wide variety of orange materials to work with. I'm finidng that the July block is presenting a similar challange. It's white. We'll have to see how that works out as I work through it.


Until Next time...Happy Needling!!!

Gerry

21 April 2012

CQJP 2012 - April & May

Good morning! Just popping in to post a photo of my finished blocks for April and May.
If you woud like to see what the other participants have been up to, pop on over to the CQJP 2012 blog. Until Next time...Happy Needling!!!

Gerry

20 March 2012

CQJP 2012 - March

Yahoo!!!! Three months in a row I've managed to finish my blocks. Of course, a 6 x 6 block isn't all that difficult to work, but still....

Sadly, I could not get a decent photo of this block. It is so much prettier than this. Oh well.


See all of the other participant's blocks at the CQJP 2012 blog.

Until Next time...Happy Needling!!!

Gerry

More Window Treatments...

Now that DH's old office is turned into a library/guest room I decided to tackle the window. I knew that I wanted drapery panels to the floor but I didn't want to completely cover the window. The compromise??? Dummy panels with a valance.


I love the feel of this fabric and the way it hangs but I seriously underestimated the difficulty of matching the repeat on the valance. Luckily, there were only two seams to do.


And believe it or not - DH suggested the dangle trim! He's catching on nicely, isn't he? LOL.


Until Next time...Happy Needling!!!

Gerry

Hand Made Roman Shades

Yes, I've been HOME-DECORing AGAIN! Not complaining....I do love it so. LOL. Besides, why would you pay designer prices for custom work when you can do it yourself?

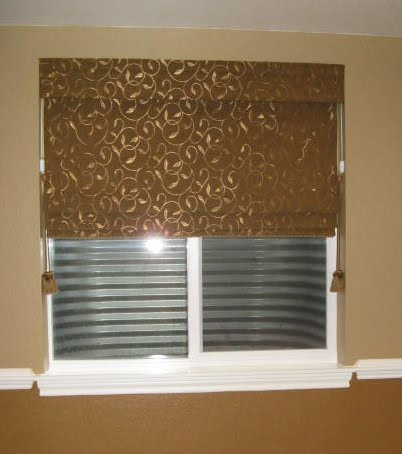
One of my latest projects are these little beauties that I made for the four windows in the basement. They are called Top-Down, Bottom-Up (TDBU)Roman Shades and are offered by Terrell as a free project on her website. She also has a fabulous blog that I follow.

Terrell gives fabulous step-by-step instructions, provides a supplies calulator, and offers very reasonable prices on the hard to find supplies.

I did make a few alterations/modifications in my shades but that was only to suit my needs/wants for the space. I opted for inside mounting shades, which are 45W x 46L finished, including the piping/trim at the bottom. The valance is 45 1/2 W by 6 1/2 L and is lined, mounted on a tension rod, and does an nice job of finishing off the window as well as hiding the mounting hardware.

I love these shades because of the flexibility they offer. And even though we get great light in the basement, looking at the silver, metal in the window wells is not attractive at all!

Here we get to see the outdoors instead.


Here we can make adjustments to what we see.


As you can see, there is a header board which holds the eye screws and lifting/lowering strings.


Here you can see that the shades are fully lined and how they are strung.


The lines you see in the folds are plastic battens, which are used to not only lift and lower the shade but also to hold the shade's shape. I also like that the lining darkens just enough to filter and not to black out the light.


See how easy that was???? Please let me know if I've inspired you to make your own TDBU Roman Shades.

Until Next time...Happy Needling!!!

Gerry

Bridal Essentials

Since I've been trying to get some use out of my studio lately, I've managed to find numerous projects to work on.

Along with more window treatments, shadow boxes, and various decor projects, I've been working on some must have bridal essentials for a friend (Amie) who is getting married next month.

This is the little gifty that I will present to her at her bridal shower this weekend along with her shower gifts (which I'll share later).

I found this darling little box at Michael's last week. Amie's colors are white, pewter, and black. Needless to say, when I saw this box it was a PERFECT fit for a Memory Box/Keepsake holder! It's very 'chic' inside and even has a magnetic flap closure on the front.

Inside of the lid I've added my copy of her wedding invitation and 'hold the date' reminder card under a sheet of clear plastic. I trimmed it with pewter ribbon and added sparkly jewel-like embellishments in the corners.


Don't you just love the little 'teddy bear' bride and groom figurine? I've had it stored away for so long that it was pure luck to run across it! LOL. Now it will have a new home and a purpose....


The ring bearer's pillow started out as a 12 x 12 pillow form purchased from Hancock Fabrics. I took it apart and sized it down to 9 1/2 x 9 1/2, covered it with a lightweight drapery lining and pre-tufted it. I then covered it with a layer of bridal satin and lace, and retufted it with glass beads. I used tiny, clear, decorative buttons on the back to secure the threads during tufting.

The pewter fabric was meant to resemble a bow tie. I attached the heart clasp to hold the 'tie' shut. When the clasp is open it reveals the beautiful lace, beads, and of course, the tufting.


I also added a piece of the pewter fabric to the back so that the ring bearer (Rylie), who is only two, would be able to easily hold onto it.


Next is the Bride's Money Purse. I wanted to make something pretty and elegant but not too busy. And not too much dangling off of it. Since Amie will have this piece hanging off of here arm for a good portion of the night, it also needed to be a manageable size and fairly sturdy. What a nightmare it would be to have beads falling off and bouncing all over the room - YIKES!!!!


Don't you just love the way this looks when it’s closed? Complete with a built-in flower on top!


Lastly, I modified a small wrapping paper roll. I wanted a scroll type holder for the genealogy/family tree scrapbook pages I bought for the bride and groom. I covered the paper roll with paper then used a couple of small, round wall/floor protector pads. Covered them with the same paper, then added a 'pull' for one end and voila, we have a scroll tube!


Well, that's it for now. Thanks for stopping by.

Until Next time...Happy Needling!!!

Gerry

Roses 3 RR - Lorrie

This is the work that I did on Lorrie's block.

Luckily, the upper left hand corner was still available. That is, afterall, my favorite place to begin working a block.


It has now arrived home, safe and sound. This block was really big and toward the end of the RR, it became really heavy with all the goodies added to it. LOL. Lorrie says she wants to make it a pillow or wall hanging for her bedroom. I look forward to seeing it finished and in its new home.

I'm hoping to have my completed block home soon, too.

Until Next time...Happy Needling!!!

Gerry