You certainly wouldn't think so by looking out my windows this morning. In fact, the view is more of a Winter Wonderland!
From the looks of it we got nearly a foot of snow from the storm that came in fast and furious yesterday afternoon. Not our typical storm at all. For the most part the snow was literally blowing sideways. And is/was so heavy and wet that it's still stuck to the side of houses, fence posts, etc.
I was a bit surprised to find our regular little visitor perched in the tree this morning. It was knocking the snow off of the berries and having breakfast as if nothing had changed. I don't know if this is the same robin that visits each time but we have had a robin in that tree, almost daily since we moved in.
Hopefully, it will warm a little and clear a little and the sun will find a way to peak through the fog and greet us. In the mean time, I think I'll cuddle up on the couch with Fritz and do a little stitching.
Be careful if you have to be out and about today!
Until Next time...Happy Needling!!!
Gerry
24 March 2010
19 March 2010
Taking a Time Out
If you've come to visit and have noticed that my blog is looking a little different, then I thank you for noticing! I'm in the process of finishing up some projects and am really working on getting some of my wares up for sale. Some of the new links are working and the rest of them will be shortly.
I also have a considerable amount of cleaning up to do on both blogs. I decided to copy and past my original template to the 'selling blog' because it was quicker and easier. However, I failed to clean up this one first. Now, I have two of them to work on. Oh well....
In the mean time I thought I would post a few photos of a couple of things I'm working on that aren't work.
First is my Yule block that was originally made for the CQN 2009 STS (Season to Season) Winter block share. As it happens, I'm not participating in the Winter or Spring rounds with the group but I do want to finish this set for myself. These blocks have special meaning for me and I don't want them to end up being yet another UFO in the bottomless box I have downstairs. I still need to add lots of beads, a charm or two and the spider.
Next is a sane(ish) quilt that I'm putting together. I say, "sane(ish)" because in addition to 'traditional' piecing and layout, I'm also adding hand embroidered motifs to it. I have several months to finish it but I need to be mindful of how quickly time can get away from you when you're juggling a number of projects at once.
I begin with this photo because a functional work space is essential. One day all of this will be in a much larger space downstairs but for right now, I'm feeling just a little pinched in this 12 x 15 foot room. Even without both buffet tables, it feels really full with the computer, desk, chair, two printers, filing cabinet, paper storage shelf, two full size dressers/hutches, a sewing table and two chairs, a sewing machine, serger, iron and ironing board, and of course all of the necessary collateral STUFF!!!! I do like that there is a lot of storage both the furniture pieces as well as in the large double closet, which also has a (portable) four shelf shelving system in it.
This quilt will be approximately 58" x 75" finished. And will drape nicely on a twin bed or as a decorative cover/spread for a full bed. Believe it or not, this project was originally going to be a 42" x 62" sofa throw. Obviously, I got a little carried away. That was due in part to the fact that my focus fabric are a panel piece. I've had this particular fabric since before my DH was born (nearly 21 years) and the time had finally come to cut into it!
If you've worked with these 'buy it by the panel' fabrics then you know that they are seldom symmetrical or square, and often times very large in scale. I actually like them and I've used them in my projects many times in the past, and after a little trial and error they were tweaked out. I also found it really handy and helpful (this time) to draw out the quilt design on graph paper before I started. Which is a good thing because I made numerous changes along the way. I know there is someone reading this and saying to themselves, "duh, that's a no-brainer" but I've never done it before.
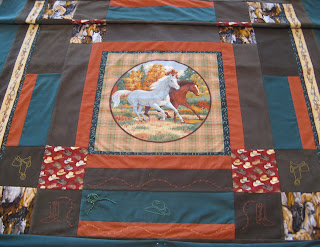
I also chose not to make a typical pieced quilt. Simple squares and rectangles seemed to make the most sense given the focus and companion fabrics I am using. I'm not sure how true the colors are coming through but they are: Rust, Hunter Green, Rust/Oranges in the panels (cotton), with coordinating Rust (broadcloth), Dark Brown (Ultrasuede), and Dark Olive Green (Ultrasuede). There are also Browns/Reds in the hat fabric (cotton), White, Silver, Beiges, and Blacks in the horse fabric (cotton), and a trace of Blue in the stirrup border fabric (part of the panels).
The quilt back will be the Dark Olive Green Ultrasuede. Luckily, it came in 60" wide and will be one, solid piece.
As you can see, I've started to add some embroidery outlines to the quilt, keeping with the horse theme and leaning toward a more 'Cowboy' theme overall. So far I've added a cowboy hat, lasso (green and gold cording) and barbed wire at the bottom center.
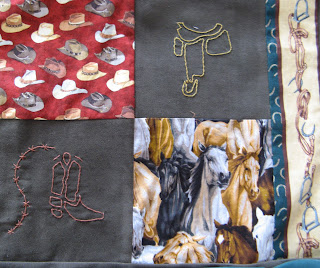
In the bottom corners I've added a saddle and cowboy boot with more barbed wire. I guess I should mention that I'm using stencils for these motifs outlines. There are three sheets in the package, offering numerous designs. I'm sure I won't be able to use nearly as many as I would like to.
Additionally, I made some of my own templates (mountains, hills, and pine trees) that I will add somewhere. I'm also planning to make a pair of matching pillowcases, or maybe shams, or both. I haven't decided that yet, either. Let's see how I feel about it after I get done hand quilting the quilt!
Well, that's it for now. This post is far longer than I had intended it to be. I'll keep posting my progress. Thanks for visiting and have a wonderful weekend!
Until Next time...Happy Needling!!!
Gerry
I also have a considerable amount of cleaning up to do on both blogs. I decided to copy and past my original template to the 'selling blog' because it was quicker and easier. However, I failed to clean up this one first. Now, I have two of them to work on. Oh well....
In the mean time I thought I would post a few photos of a couple of things I'm working on that aren't work.
First is my Yule block that was originally made for the CQN 2009 STS (Season to Season) Winter block share. As it happens, I'm not participating in the Winter or Spring rounds with the group but I do want to finish this set for myself. These blocks have special meaning for me and I don't want them to end up being yet another UFO in the bottomless box I have downstairs. I still need to add lots of beads, a charm or two and the spider.
Next is a sane(ish) quilt that I'm putting together. I say, "sane(ish)" because in addition to 'traditional' piecing and layout, I'm also adding hand embroidered motifs to it. I have several months to finish it but I need to be mindful of how quickly time can get away from you when you're juggling a number of projects at once.
I begin with this photo because a functional work space is essential. One day all of this will be in a much larger space downstairs but for right now, I'm feeling just a little pinched in this 12 x 15 foot room. Even without both buffet tables, it feels really full with the computer, desk, chair, two printers, filing cabinet, paper storage shelf, two full size dressers/hutches, a sewing table and two chairs, a sewing machine, serger, iron and ironing board, and of course all of the necessary collateral STUFF!!!! I do like that there is a lot of storage both the furniture pieces as well as in the large double closet, which also has a (portable) four shelf shelving system in it.
This quilt will be approximately 58" x 75" finished. And will drape nicely on a twin bed or as a decorative cover/spread for a full bed. Believe it or not, this project was originally going to be a 42" x 62" sofa throw. Obviously, I got a little carried away. That was due in part to the fact that my focus fabric are a panel piece. I've had this particular fabric since before my DH was born (nearly 21 years) and the time had finally come to cut into it!
If you've worked with these 'buy it by the panel' fabrics then you know that they are seldom symmetrical or square, and often times very large in scale. I actually like them and I've used them in my projects many times in the past, and after a little trial and error they were tweaked out. I also found it really handy and helpful (this time) to draw out the quilt design on graph paper before I started. Which is a good thing because I made numerous changes along the way. I know there is someone reading this and saying to themselves, "duh, that's a no-brainer" but I've never done it before.
I also chose not to make a typical pieced quilt. Simple squares and rectangles seemed to make the most sense given the focus and companion fabrics I am using. I'm not sure how true the colors are coming through but they are: Rust, Hunter Green, Rust/Oranges in the panels (cotton), with coordinating Rust (broadcloth), Dark Brown (Ultrasuede), and Dark Olive Green (Ultrasuede). There are also Browns/Reds in the hat fabric (cotton), White, Silver, Beiges, and Blacks in the horse fabric (cotton), and a trace of Blue in the stirrup border fabric (part of the panels).
The quilt back will be the Dark Olive Green Ultrasuede. Luckily, it came in 60" wide and will be one, solid piece.
As you can see, I've started to add some embroidery outlines to the quilt, keeping with the horse theme and leaning toward a more 'Cowboy' theme overall. So far I've added a cowboy hat, lasso (green and gold cording) and barbed wire at the bottom center.
In the bottom corners I've added a saddle and cowboy boot with more barbed wire. I guess I should mention that I'm using stencils for these motifs outlines. There are three sheets in the package, offering numerous designs. I'm sure I won't be able to use nearly as many as I would like to.
Additionally, I made some of my own templates (mountains, hills, and pine trees) that I will add somewhere. I'm also planning to make a pair of matching pillowcases, or maybe shams, or both. I haven't decided that yet, either. Let's see how I feel about it after I get done hand quilting the quilt!
Well, that's it for now. This post is far longer than I had intended it to be. I'll keep posting my progress. Thanks for visiting and have a wonderful weekend!
Until Next time...Happy Needling!!!
Gerry
05 March 2010
Faery Wish Boxes
Today I would like to share with you these little boxes that I created as Christmas presents for three of my nieces. Luckily, I had three little girls who are just crazy about faeries and the boxes were a huge success!!!
I found a pattern online for an Exploding box and tweaked it to fit my purpose. I sized it down to make a 3" cube, made the lid lip deeper, and trimmed to compensate for the thickness of the fabric. Then taking each of my nieces' personalities into consideration, I chose fabrics, colors, added lace, charms, bobbles, and other embellishments to each box.
I also added a ribbon pull closure onto the outside of the box to make it easier to close. All those parts are a challenge for little hands. The unexpected bonus to that was that since the box didn't open flat not only did the Faery Dust stay put but it created a nice little self-contained bit of scenery and fantasy. At the end of each ribbon pull I added a charm (Dream. Hope. Believe.) for decoration and inspiration.
I created little bottles of Faery Dust by using a 1/2 dram glass bottle with a screw on cap, a few drops of Grape seed oil and some glitter. And since it's really messy stuff if it gets spilled, you will notice that when I wrote the poem I tried to make it clear that the bottle must NOT BE OPENED.
This of course was done under the guise that to do so would allow the Magick to escape. I even tried to re-enforce that warning with the little sign above the bottle. But what was the very first thing my nieces tried to do???? Oh yeah - it was opening the bottle. But seriously, what did I expect? LOL .
And finally, I also tried to head off any complaints of, "My wish didn't come true!" by adding the, "meant for you" caveat. Ya gotta think ahead with kids! Here is the poem:
I am your Faery
And believe you must
When making a wish
With your Faery dust.
You can shake if you like
But leave the cap on
Or the magick inside
Soon will be gone.
Now, make a wish
Then wait to see
If what you want
Is meant to be.
For not all wishes
Will come true
'Twill be only those
Which are meant for you.
I chuckle at this because my youngest niece told me that her wish had come true. That she wished for grandma to come and live with them - and she did. Boy, did I get lucky there!!!
I really think that these boxes would be a wonderful idea for items to list in my Etsy Shoppe. I also think that the concept alone lends itself to numerous possibilities, applications, and variations. Although, they would probably be most suited to teens or adults because they are made out of card stock, after all. They aren't fragile but they aren't really designed to stand up as a toy or plaything. So, as soon as I work out some of the kinks, I'll get a few made up.
As always, click on the image to enlarge it.
Well, that's it for now. Thank you for joining me. Have a wonderful weekend and Until Next time...Happy Needling!!!
Gerry
I found a pattern online for an Exploding box and tweaked it to fit my purpose. I sized it down to make a 3" cube, made the lid lip deeper, and trimmed to compensate for the thickness of the fabric. Then taking each of my nieces' personalities into consideration, I chose fabrics, colors, added lace, charms, bobbles, and other embellishments to each box.
I also added a ribbon pull closure onto the outside of the box to make it easier to close. All those parts are a challenge for little hands. The unexpected bonus to that was that since the box didn't open flat not only did the Faery Dust stay put but it created a nice little self-contained bit of scenery and fantasy. At the end of each ribbon pull I added a charm (Dream. Hope. Believe.) for decoration and inspiration.
I created little bottles of Faery Dust by using a 1/2 dram glass bottle with a screw on cap, a few drops of Grape seed oil and some glitter. And since it's really messy stuff if it gets spilled, you will notice that when I wrote the poem I tried to make it clear that the bottle must NOT BE OPENED.
This of course was done under the guise that to do so would allow the Magick to escape. I even tried to re-enforce that warning with the little sign above the bottle. But what was the very first thing my nieces tried to do???? Oh yeah - it was opening the bottle. But seriously, what did I expect? LOL .
And finally, I also tried to head off any complaints of, "My wish didn't come true!" by adding the, "meant for you" caveat. Ya gotta think ahead with kids! Here is the poem:
And believe you must
When making a wish
With your Faery dust.
You can shake if you like
But leave the cap on
Or the magick inside
Soon will be gone.
Now, make a wish
Then wait to see
If what you want
Is meant to be.
For not all wishes
Will come true
'Twill be only those
Which are meant for you.
I chuckle at this because my youngest niece told me that her wish had come true. That she wished for grandma to come and live with them - and she did. Boy, did I get lucky there!!!
I really think that these boxes would be a wonderful idea for items to list in my Etsy Shoppe. I also think that the concept alone lends itself to numerous possibilities, applications, and variations. Although, they would probably be most suited to teens or adults because they are made out of card stock, after all. They aren't fragile but they aren't really designed to stand up as a toy or plaything. So, as soon as I work out some of the kinks, I'll get a few made up.
As always, click on the image to enlarge it.
Well, that's it for now. Thank you for joining me. Have a wonderful weekend and Until Next time...Happy Needling!!!
Gerry
Labels:
Crafts,
Etsy,
Fabric Art,
Gifts,
Holidays,
My Projects,
Poems and Quotes
Subscribe to:
Posts (Atom)