I had such a good time putting this boot stocking together and I'm so happy with the way it turned out that I'm going to gloat (some) and share with you the steps I took getting it to where it is now. At least the ones that I remembered to take pictures of (DUH). It's so easy to forget to do that.
As I put in a prior post, I ended up designing this boot stocking from a miss-match of patterns that I had. I had expected that when finished it would be approximately 11" long by 5 1/2" wide at the top and 6 1/2" wide at the bottom. I was surprisingly close. The only difference is that it's actually 12 1/2" long. The cuff at the top accounts for most of that difference.


I started this project in early September, still very much a 'newbie'. And I mean newbie! I joined my first CQ group, (CQN) in July, and attempted my first block in August. That block BTW is wadded up and at the bottom of my ever growing UFO and WIP pile. Anyway, I found it very interesting that I was actually able to see the improvement that I was making with my stitches while working on this project. In the beginning I was really tickled when I had 3 stitches down, fairly 'pat'. Now, I have about 6 of them working for me. LOL. The point being, that it gets easier, and practice really does make a difference.


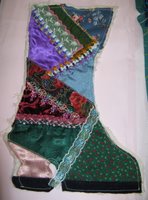
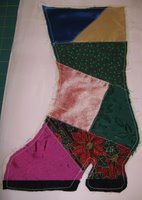
The pictures above show the embellishing finished, the front and back pieces sewn together, and a wide(ish) strip of ribbon sewn down both sides. This I must confess was not planned. I obviously didn't leave myself enough of a seam allowance in the beginning. And as I worked on it the muslin frayed. In the end, I was able to get a 1/4" seam in it (because I put beads and things too close to the edge) and when I turned it right-sides out, I didn't catch enough of the block pieces. So, it seemed like a perfect idea to just cover it up. It took a lot of little 'by hand' stitches but it worked out nicely. I think it adds depth and dimension to the look of the piece, too.
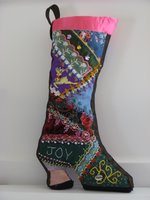
Below you can see the 'FINISHED PRODUCT", so to speak. The boot stocking is lined and to my absolute amazement, the lining fit like a glove. First time ever I haven't struggled with a lining. The cuff at the top presented a little more of a challenge but worked out as well. There is an equal amount of the cuff portion on the inside of the stocking, so it has a really nice finished edge to it. I'm also very happy with the way the heel turned out. Actually, the boot shape in general. I was pretty concerned about it right up until the end.


And finally, just to wrap things up I've included a front and back view. There is a loop for hanging the stocking and I secured it (and hid the stitches) with a couple of buttons. I think it's a nice finishing touch.

 Well, that's it for now. It's getting late and I still have loose ends to tie up for my Craft Show/Bazaar tomorrow.
10 comments:
What a great looking boot - looks like you could just slip into it. Were you planning for Mrs. Claus winter slippers? :-) Beautiful work, Gerry!
What a great boot, Beautiful work, Gerry, and you have been a busy girl, good luck with the craft show.
The finished projects are amazing! What a change after the embroidery and embellishment!
So, are you going to put them on and dance?
:)
Awe hon, this is beautiful! I just love that Santa button! Wherever did you get that? I love the colors, and love the fact that you did a lot of embellishing. Can never have enough embellishing. Lucky gal that receives that boot.
Wonderful work! I love everything.... Santa, the reindeer, the buttonhole flowers.... You did such a great job! You make it look so easy.... lol.. Brenda
Hi Gerry, However I am not nown with the Christmas boot tradition, I think you have done a very, very nice job!
I envy the person who gets this beautiful boot. Ati.
The boot is great! Now have you started your own?
Oh Gerry, it's so gorgeous!
HUGZ:)
Candi
Thanks Candi! I've seen some pretty wonderful works on your site, too! Have a good one.
Love it, Love it!! Now take your first block out of the drawer you tossed it in and either (a) fix it so you like it or (b) keep it out as a reminder of how far you've come.
Post a Comment